
Creating the first Container on a Server
This post will explain how you can set up a Jenkins job that will build a Docker image which is defined by a Dockerfile. Later, it will be deployed onto a remote server, so our application will be running in an own container on its own machine.
Our Project and the Dockerfile
In this section, we demonstrate two different approaches to build a docker container. The first one makes use of the Docker Hub. Docker Hub is a platform where you can store and publish predefined docker images. Those images can be downloaded by other users and executed or used as base for future images, respectively. The other approach is to create a Dockerfile where an image will be created based on a plain Linux image like Ubuntu. A Dockerfile is a file consisting of a sequence of various Docker commands which describe the process of building a specific image.
Pulling a predefined image from Docker Hub
As our project is written in Python and using the Django framework, as a first step we could make use of Docker Hub to find a suitable image that already contains the essential components for a quick setup.
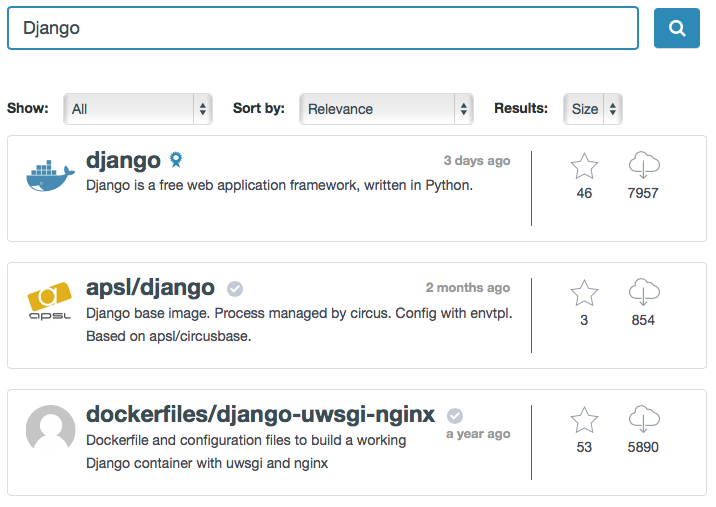
Therefore we visit the Docker Registry and search for Django.

As a result Docker Hub lists all the images that might have something to do with Django. The blue tag on the first repository signals official images that have been reviewed and approved by docker staff members. They have to follow special guidelines.
We are going to use the official Django image. By clicking on the repo we can view installation guidelines and other information. In this case, there are several images available i.e. with different Python versions preinstalled:
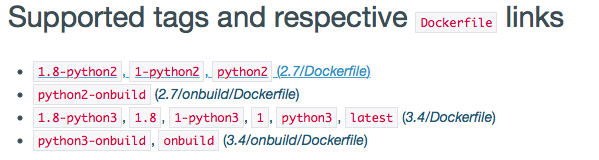
As our Django app is written in Python version 3 we choose the image django:python3-onbuild. ONBUILD is a docker technique to run additional triggers after the image has been set up in a container. We can view these triggers by inspecting the image (look for the OnBuild section).
docker inspect django:python3-onbuild
In our case:
"OnBuild": [
            "COPY requirements.txt /usr/src/app/",
            "RUN pip install -r requirements.txt",
            "COPY . /usr/src/app"
        ],
This means that a requirements.txt is needed inside of our projects root folder. As content of the textfile we define all our project dependencies such as numpy or matplotlib:
django
git+https://github.com/jgru/training_monitoring.git
xlrd
numpy
matplotlib
pylatex
click
Finally we write our Dockerfile and place it in the root folder as well:
FROM django:python3-onbuild

RUN apt-get update

RUN apt-get install -y texlive-base texlive-latex-recommended texlive-latex-extra texlive-fonts-recommended texlive-fonts-extra
In order to install additional LaTeX dependencies we added two RUN commands which will make sure to pull and install everything we need for our setup. Those RUN commands and the contents of requirements.txt are optional and depend on the kind of project and its dependencies.
We can then build and run the Docker image (Make sure that you run the build command inside of the projects root folder):
docker build -t my-django-app .
docker run --name some-django-app -p 8000:8000 -d my-django-app
Now we could test our app by visiting http://localhost:8000 in a browser as it will automatically serve the web application.
Contributing to Docker Hub
After signing up on the Docker Hub Website everyone is able to contribute docker images.
First we login to our account by typing the docker login command on your machine.
Before uploading an image, it should be correctly tagged with our name. It’s convention on Docker Hub to tag images with [USERNAME]/[PROJECT NAME]. To achieve this, we use the docker tag command.
docker tag my-django-app mn033/my-django-app
All that is left to do is push up our image:
docker push mn033/my-django-app
After pushing we will find the image on our personal repo on the Docker Hub Website.
Really easy, isn’t it?
Creating an image based on a plain image using a Dockerfile
Now we demonstrate how to build an image based on a plain Linux by using a Dockerfile which comprises the entire image specification. The comments provided in the Dockerfile should suffice as description for the used commands.
# Set the base image to Ubuntu
FROM ubuntu

# File Author / Maintainer
MAINTAINER ComputerScienceAndMedia

# Update the sources list
RUN apt-get update

# Install basic applications
RUN apt-get install -y tar git curl nano wget dialog net-tools build-essential pkg-config

# Install Python3 and required dependencies
RUN apt-get install -y python3 python3-dev python3-pip libfreetype6-dev

# Adding the application and requirements to the image
ADD /app /test_application
ADD /requirements.txt /test_application/requirements.txt

# Get pip to download and install requirements:
RUN pip3 install -r /test_application/requirements.txt

# Expose ports
EXPOSE 8000

# Set the default directory where CMD will execute
WORKDIR /test_application

# Set the default command to execute when creating a new container
# to change the port use: python3 manage.py runserver 0.0.0.0:1234
CMD python3 manage.py runserver
To generate an image based on this Dockerfile we execute the following command:
docker build -f OurDockerfile -t my-image-name .
Please note that the command ends with a dot. This is the working directory which is used when the Dockerfile is processed. So, all paths in the Dockerfile will be based on this path. Example: If you set a path to / in the Dockerfile it will be the current working directory if . is specified in the build command.
Note: The example in this section is adapted to our sample application. It is supposed that the current working directory contains the entire Git repository django_project.
Setup Jenkins
- Create a new Jenkins job as described in one of our previous posts “How to trigger a Jenkins build process by a GitHub push”.
- With installing the Docker plugin on Jenkins you will have more options for your build process. As we want to trigger a build with a new push from GitHub we tick the box “Build when a change is pushed to GitHub”. But you could also predefine a time schedule. Furthermore the Docker plugin allows to build when a new image is built on DockerHub.
- If you want to test whether your container is working at all, you could try starting it through a shell first with
docker build -f "$WORKSPACE/Dockerfile" -t "csm_$BUILD_ID" $WORKSPACE. Commands with$in front are environment variables from Jenkins.findicates the file name which can be found in our project workspace.tstands for the repository name for the image. The Docker commands can be found here. - Instead using the shell we would like to use the provided Docker plugin functions such as “Execute Docker Container”, which will be described here soon.
##Troubleshooting
1. Avoid spaces in your Jenkins project name.
2. If you want to change the language in Jenkins simply change it in your browser. For Firefox use e.g. the add-on Quick Locale Switcher.
3. If you want to start a docker container through a shell script, you need to be an administrator, however sudo will not work. So it is required to create a docker group if it does not already exist.
* sudo groupadd docker
* Add the connected user ${USER} to the docker group. sudo gpasswd -a ${USER} docker
* Restart the Docker daemon with sudo service docker restart (for Ubuntu 14.04 use sudo service docker.io restart)
* Restart your Jenkins server (or even the whole server).